Register For the Visio Master Class Session 4 (15th Jan, 8 30 PM to 10 30 PM India Time)
Click Here To Register
-->
Register For the Visio Master Class Session 4 (15th Jan, 8 30 PM to 10 30 PM India Time) Click Here To Register
0 Comments
Visio App has got a BPMN stencil under the flow chart category since Visio 2013. Seqeunce flows BPMN are default flows and conditional flows. This video explains to you the usage of the sequence flow in a BPMN model through a Visio Practical Few Points to Remember about BPMN
To insert a new page in Microsoft Visio, go to Insert ribbon, Pages Group and “New Page” as shown in Picture 1, shown below Now click on the New Page icon. If you click on the New Page Icon a new blank page ( Visio foreground page) will be inserted.
How ever if you click on the small black triangle present in the bottom right corner it will ask you to Insert either a
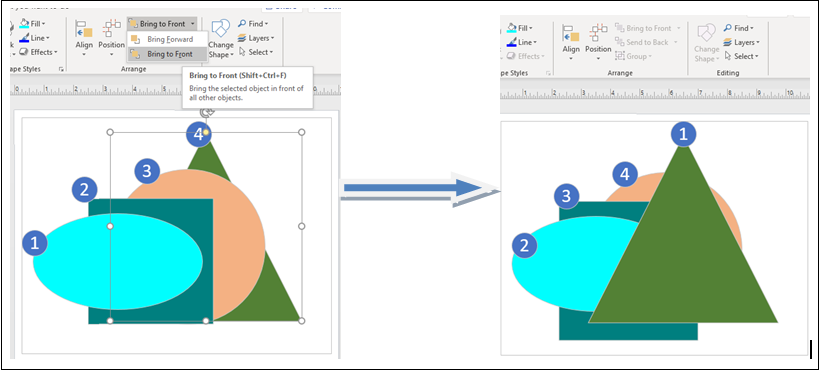
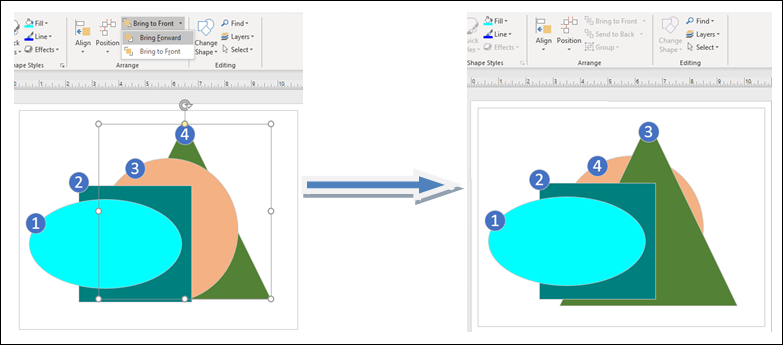
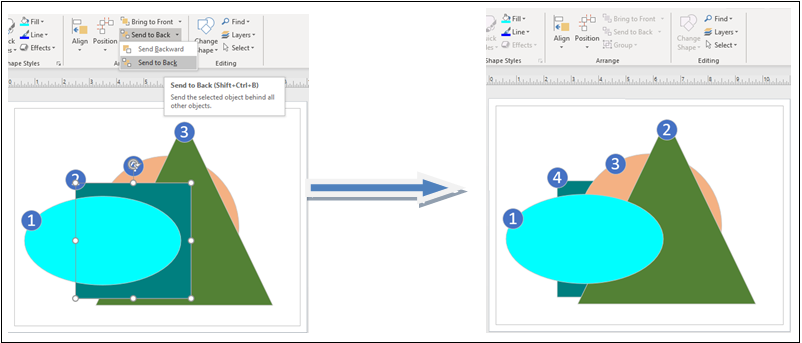
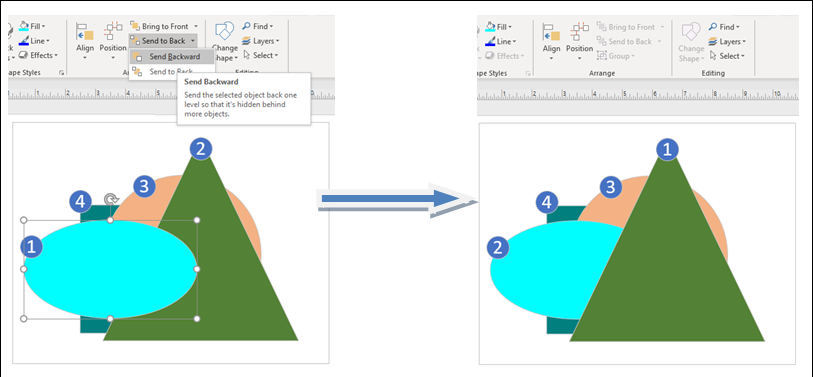
Microsoft Visio Shape – Bring to Front/Bring Forward and Send to Back/Send Backward features29/12/2019 Shapes in a Visio drawing can be placed over one another. The relative position (z-order) of shapes stacked over one another can be changed by utilizing Bring to Front / Bring Forward and Send to Back / Send Backward features. There may be problems while editing if a shape that is being covered by another; thus this Visio feature Bring to Front and Send to Back ease out the issue of editing of overlapping shapes. This feature is available at “Home” Tab in “Arrange” group. See Picture 1 of Visio Ribbon, Shown below Bring to front This feature brings the selected shape on the top of the stack. The feature is available on the Home tab in the Arrange group. Select the shape, click on (In picture 2 we selected the green triangle, on the left) Bring to Front. After clicking on Bring to Front the Green Triangle shape comes on the top. See Picture 2 below. Bring Forward Bring Forward Feature Brings the selected shape one step closer to the front: This feature is available on the On the Home tab in the Arrange group, Select the shape (we selected Green Triangle shape as shown below) click the arrow next to or under Bring to Front, and then click Bring Forward. You can notice that the selected Green Triangle shape which was at the bottom of the shape stack, came over the Send to Back Sends the selected Shape to the bottom of the stack: This feature is available On the Home tab in the Arrange group. Select the shape , click on Send to Back. icon. Here we selected Blue triangle shape and clicked on send to Back. See picture 4 below Send Backward Send a shape one level below on the stacking order: Here we selected the blue ellipse and clicked on Send to Back . You can see in Picture 5, shown below that the blue ellipse shape went behind the green triangle shape after the operation was performed
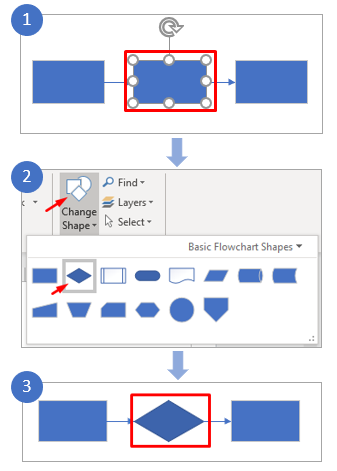
Let’s find change shape feature in Microsoft Visio? Microsoft Visio introduced “Change Shape” feature in Visio 2013 edition which allows you to change the selected shape in the drawing to another related shape. It is available in the “Editing” group of “Home” ribbon as shown in the image shown Key Benefit: Prior to the availability of change shape feature, in the drawing to change the shape you need to delete the existing shape and insert the new shape. But post availability of change shape feature you can change the shape on just single click and no need to waste your time in deleting the shape and inserting the new shape. How to use change shape feature in Microsoft Visio Templates? Follow the below steps to use change shape feature in your working visio template:
Visio is number one general purpose diagramming and modelling software. Like other software from its parent company Microsoft it is easy to use yet 1. Ctrl+1 - Pointer ToolWhen you draw a diagram in Visio or Visio 2019 or Visio 19 you need to toggle between, Pointer Tool, Connector Tool and Text Tool. Pointer tool is shown below. With the help of Pointer tool in Visio you can select a shape on a Visio diagram with a single click. The shortcut to revert to Pointer tool is Ctrl+1. You can access the Pointer tool in the Home Tab or Home Ribbon of Visio under the Tools Group as shown below in the image 2. Ctrl+2 - Text ToolText tool available on the Home Ribbon and Tools Group allows the Visio modeler to write text on the selected shape. Short cut key for Text Tool is Ctrl +2, same can be accomplished by pressing the F2 key as well 3. Ctrl+3 - Visio Connector ToolCtrl+3 is a handy short cut key in Visio which takes you to the connector tool. You know that a visio drawing is a collection of shapes connected through Visio connectors or lines. Hence it is natural that time and again you will need the connector tool to connect shapes with one another. Just when you need a connector tool press Ctrl+3 keys together on Visio and you can connect your Visio diagrams quickly. Connector tool can also be accessed on the home tab in the tools group on the ribbon, see image below. 4. Ctrl+D -Duplicate Visio ShapesTo duplicate a selected Visio shape , you need to select the Visio shape and then press Ctrl+D. In the below image the not selected shape (as shown in the image) was selected and then Ctrl+D was pressed. Immediately a new similar (size and other properties are same) pops up on the Visio diagramming area. The shape which is over the first shape and is in selected state is the duplicate Visio shape. 5. Ctrl+L - Rotate Selected Shape 90 degrees to leftIf you wish to rotate a Visio shape 90 degrees in counter clock wise faishon. Select the Visio shape and press Ctrl+L. This is same as rotating shape 90 degrees to the Left
Visio Standard 2019 and Visio Professional 2019 have been launched by Microsoft in a quiet launch in October 2018 as per planWith this launch, as on October / November 2018, Vision 19 Professional and Visio 19 Standard editions will have same features as Visio Online Plan I and Visio Online Plan II respectively. Some New Features in Visio 19 Professional Edition
Find below a sample quiz on Microsoft Visio. This quiz draws features and functionalities of Visio Standard 16, Visio Professional 16, Visio for Office 365 Plan I and Visio or Office 365 Plan II features.
This post, which is a visual highlights various features / various icons available in the Visio Diagram Page
|
Services |
Company |
|